Wednesday, June 29, 2011

Easy Peasy Pizza

The great thing about pizza is that it can be as healthful or as sinful, as involved or a simple as you like.  Last night’s pizza was a true team effort.  Sander was the advance-guard (I was at team work drinks celebrating the end of the fiscal) and decided he wanted to make the pizza base from scratch because the supermarket-bought versions weren’t thin enough.  Excellent idea!  There’s nothing worse than thick soggy pizza crust.  I was in charge of composition and final cooking.  Next time I’m definitely going to do the base as well – it looks fun!

I hear that base-attempt number one didn’t go so well – the carefully built ‘well’ of dry ingredients had a weakness in the wall which resulted in a river of flour on the floor.  Learning from experience, the second attempt was much more successful and patiently rising on the balcony when I arrived home.

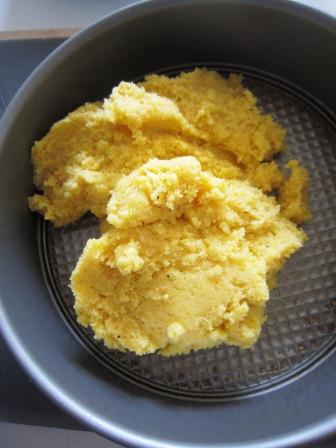
A minor obstacle presented itself in the absence of a rolling pin.  Not to worry, who needs a rolling pin when you have an Easiyo maker? Not us!  Plus our pizzas were delightfully non-circular.

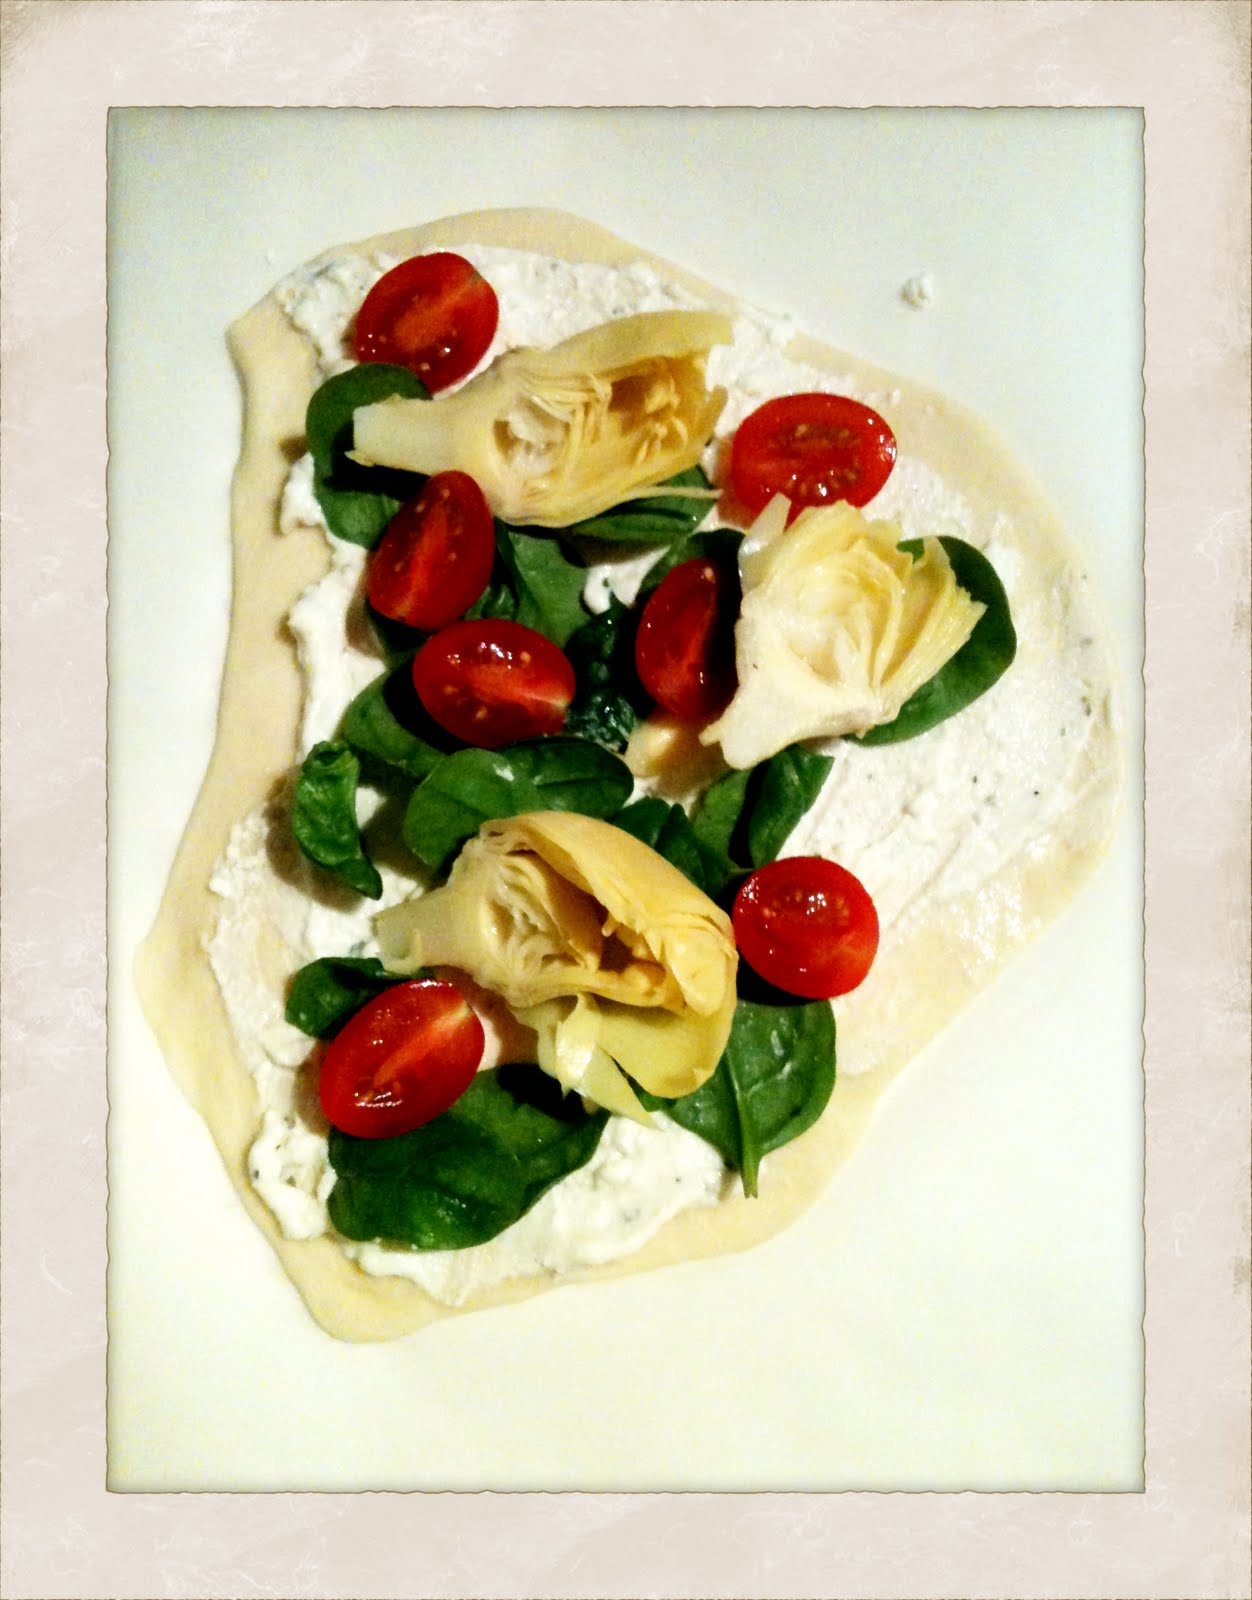
The toppings were very easy to whip up – minced garlic, ricotta, feta and oregano as the base, fresh cherry tomatoes (halved), baby spinach, artichokes and pan-fried chicken, then a sprinkling of Parmesan cheese.  Less than 10 minutes later we were curled up on the sofa, eating pizza and watching Season 4 of Mad Men (utterly addicted – dining room table has been abandoned until the end of the season).

And as I type here with left over pizza warming my tummy for lunch, I can tell you that the leftovers taste just as good the next day.


The finished product

Our unique pizza base shapes


Here are the recipes: Jamie Oliver’s super quick and easy pizza base, and Epicurious’ pizza recipe


Pizza Dough

We used half of everything in this recipe and still have a medium sized ball sitting in our freezer for later use.  Despite my campaigning for whole wheat flour, Sander used standard all-purpose white flour. 

Here’s the link to Jamie’s full recipe (here) – but I have faithfully copied the key points.

Ingredients
1kg strong white bread flour or Tipo ‘00’ flour or 800g strong white bread flour or Tipo ‘00’ flour, plus 200g finely ground semolina flour
1 level tablespoon fine sea salt
2 x 7g sachets of dried yeast
1 tablespoon golden caster sugar
4 tablespoons extra virgin olive oil
650ml lukewarm water


Sieve the flour/s and salt on to a clean work surface and make a well in the middle. In a jug, mix the yeast, sugar and olive oil into the water and leave for a few minutes, then pour into the well. Using a fork, bring the flour in gradually from the sides and swirl it into the liquid. Keep mixing, drawing larger amounts of flour in, and when it all starts to come together, work the rest of the flour in with your clean, flour-dusted hands. Knead until you have a smooth, springy dough.

Place the ball of dough in a large flour-dusted bowl and flour the top of it. Cover the bowl with a damp cloth and place in a warm room for about an hour until the dough has doubled in size.

Now remove the dough to a flour-dusted surface and knead it around a bit to push the air out with your hands – this is called knocking back the dough. You can either use it immediately, or keep it, wrapped in clingfilm, in the fridge (or freezer) until required. If using straight away, divide the dough up into as many little balls as you want to make pizzas – this amount of dough is enough to make about six to eight medium pizzas.


Artichoke, Feta and Chicken Pizza

I’ve amended the recipe below to reflect my method - I added some minced garlic to the base sauce  and sprinkled some dried chilli over everything at the end for a bit of zing.


Ingredients
2 boneless, skinless chicken breasts, thinly sliced
1/4 teaspoon dried oregano
1 clove of garlic, minced
115g  goat cheese
1/2 cup nonfat ricotta
1 whole-wheat pizza crust (large)
1 can rinsed and drained artichoke hearts, halved
Handful of cherry tomatoes, halved
As much Parmesan cheese as you like, grated
1 tablespoon fresh oregano (or basil)

Set oven to 230°C.  Sprinkle chicken with dried oregano, salt and pepper and pan-fry until cooked. Mix goat cheese, minced garlic, dried oregano and ricotta in a bowl; spread evenly over pizza crust. Top with chicken, artichokes, and tomatoes; sprinkle with Parmesan. Bake until Parmesan turns golden, about 8 minutes. Sprinkle with fresh herbs if you have them and serve.

Wednesday, June 22, 2011

Ricotta-Stuffed Jumbo Pasta Shells

This week has started off in direct contrast to last week (a week of Monday nights).  It's amazing the difference a series of good sleeps can make.  Last week I pretty much had to force myself not to resort to takeaways, but this week I'm bubbling full of energy and inspiration (at least so far, it's early days!).  Eight hours is pretty much my minimum, but for some reason (currently Mad Men series 1 - 3) I never seem to get it regularly enough.

When I'm tired I want comfort food - I'm sure everyone is the same.  But have you noticed how often comfort food comes in a bowl?  Thick soup, spaghetti bolongese, rice pudding, ice cream...

I came across this recipe last week when reading a food blog I follow (101 Cookbooks - it's really good) and it has all the ingredients (excuse the pun) for a perfect comfort food dinner.  Pasta, ricotta (adds creamy taste and texture, but lower in fat), all baked in tomato sauce in the oven... delicious!

I would say that the official version is low-intensity, but I forgot to buy jumbo pasta shells, so stuffing each individual pasta shape was a bit time consuming.  Occasionally it's quite nice to switch off and lose yourself in some repetitive work so I didn't mind too much, especially when the stuffing is finger-licking good.

The great thing about this recipe is that you can prepare it in advance if you like - just keep the stuffed shells in the fridge.

My photo didn't come out as well as in 101 Cookbooks - stark kitchen light and an iPhone camera do not always produce great photos (but it's not impossible!).  I'm actually contemplating broadening my photography skills with this course I spotted when out for lunch on Sunday - a course on product photography.  Could be interesting, and very relevant!  But I digress...


Image from 101 Cookbooks


My version - not quite so pretty

Stuffed Shells (from 101 Cook Books)

zest of one lemon

Sauce:
1/3 cup / 80 ml extra virgin olive oil, plus more for the pan
1 1/2 teaspoons crushed red pepper flakes
scant 3/4 teaspoon fine grain sea salt
4 medium cloves of garlic, finely chopped
1 28-ounce can crushed red tomatoes
1 14-ounce can crushed red tomatoes


Filling:
1 15-ounce container ricotta cheese
1 egg, beaten
1/4 teaspoon fine grain sea salt
1 cup / ~5 oz grated mozzarella
1 bunch of chives, chives

25-30 jumbo dried pasta shells

Oil a 13 x 9-inch / 33 x 23-cm baking pan, or equivalent, and sprinkle the zest of 1/2 the lemon across it. Set aside. Get a big pot of water boiling, and preheat your oven to 350F / 180C with a rack in the middle.

To make the sauce, combine the olive oil, red pepper flakes, sea salt, and garlic in a cold saucepan. Stir while you heat the saucepan over medium-high heat. Saute just 45 seconds or so until everything is fragrant - you don't want the garlic to brown. Now stir in the tomatoes and heat to a gentle simmer, just a minute or two. Remove from heat and carefully take a taste (you don't want to burn your tongue)...If the sauce needs more salt add it now. Let cool.

To make the filling, combine the ricotta, egg, and salt in a medium bowl. Mix until combined, then stir in the mozzarella, remaining lemon zest, and 3/4 of the chives. Set aside.

Cook the shells according to package instructions in well-salted water - until al dente. If you overcook, the shells will tear as you attempt to fill them. Drain and let cool long enough to handle with your hands.

Spread 1/3 of sauce across the bottom of the prepared pan. Fill each shell with ricotta, and arrange in a single layer in the pan. Ladle the remaining sauce over the shells, cover with foil and bake for 30 minutes, uncover for the final 15 minutes or until the shells are cooked through. Sprinkle with the remaining chives and serve hot.

Serves 4 - 6.
Prep time: 30 min - Cook time: 45 min

Monday, June 20, 2011

Impromptu Saturday BBQ: Chickpea Salad

Your mission, should you choose to accept it, is to bring a salad to a Saturday BBQ. 

Constraints:
1.       Not a green salad
2.       You have 2 hours to shop, go home, make salad and arrive at your destination
3.       Salad must still look fabulous in the three hours between construction and consumption

The solution is a simple chickpea salad.  Healthy, tasty, colourful, quick, inexpensive and flexible – whatever you feel like, or whatever you have on hand. 


I love roughly chopped fresh herbs.  Some people like theirs finely chopped, but I just tear mine up and throw them in.  I wish there was a way to describe how evocative the smell of freshly torn basil leaves is… I was thinking about this as I was making my salad, and I really don’t think it’s possible.


There really isn’t a recipe for this, just toss your ingredients together and spend the extra time getting changed or having a glass of wine.

Chickpea Salad

·         3 cans of chickpeas, well rinsed
·         Handfuls of fresh Italian parsley and basil, torn or chopped
·         ½ pack of feta cheese
·         ½ C grated Parmesan cheese
·         Juice of 1 lemon
·         Pinch or two of dried chilli flakes
·         Cherry tomatoes, halved
·         ¼ C raisins, soaked for a few minutes in hot water

Toss all the ingredients together in a bowl, add salt and pepper (and extra lemon juice or chilli flakes) to taste.  Drizzle with a good olive oil just before serving.


There are endless variations on this theme – add seafood, haloumi cheese, nuts, lemon zest, fresh chillis…. Endless!

We had ours with an enormous green salad, perfectly BBQed NZ lamb racks, some delicious red wine and excellent company.

Sunday, June 19, 2011

Monday Nights Continued: Smoked Salmon and Spinach Orzo Salad

Continuing my week of Monday night meals...

I'm all for a fancy, complicated meal every once in a while.  When you've personally attempted to cook one (for two, six or whatever) you fully appreciate the effort which goes into them.  However, I think the tastiest meals are often the simplest, especially when they use the freshest ingredients: a simple rocket and prosciutto pizza from the Italian on the corner, roast pumpkin soup, steamed flounder for breakfast.  Some ingredients don't need any help to shine, and salmon is one of those for me.

Last night I had the luxury of being cooked for (it's a frequent luxury, but certainly a luxury none the less) by Sander.  On the menu was a simple smoked salmon, spinach and orzo salad - that's a lot of 's's'.  It's an old favourite of ours, but a meal we haven't had in a very long time.  It certainly fits into the 'Monday night meal' category.

I was so relaxed with my glass of wine that I forgot to take a photo (below is from Simply Recipes), but I wanted to share the recipe anyway.  It's a winner to have in your back pocket.  It's this simple.


Image from Simply Recipes


Smoked Salmon and Spinach Orzo Salad


1 C orzo pasta (or rissoni)
85g smoked salmon (hot or cold, flaked or chunked - your preference entirely)
1 bag baby spinach
1/2 C pinenuts
Chopped feta cheese


Cook orzo according to pack directions.  Empty bag of baby spinach into the serving dish and lightly toast the pinenuts.  Drain orzo, pour on top of baby spinach and leave for a moment while you chop feta and salmon.  Add pinenuts, a drizzle of good olive oil and some salt and pepper, then mix it all together.  Voila!

There are usually some left overs for lunch the next day.

Saturday, June 18, 2011

A Week of Monday Nights: Fish Tagine and Brown Rice

We all have one evening a week for which all effort flies out the window.  For me it's a Monday night.  Monday is usually supermarket day (because, despite best intentions, I didn't get around to it on Sunday) which is always done after work.  Even though usually there are two of us to do the shopping, we never seem to make it home before 7pm.  So Monday night meals must always be extremely quick but tasty to sooth those tired taste buds.

This week has felt like a week of Monday nights so the next few posts will be paying homage to this.

When you're pushed for time, fish is a wonderful go-to: quick cooking, flexible, healthy and delicious.  This fish tagine recipe is from my trusty Epicurious iPhone app and (as my friend Jess says in her blog) is "fridge to fork" in less than 30 minutes.  The beauty of this recipe is that almost everything was already at home in the pantry - tinned tomatoes, spices, rice.  All I had to do was pop into the supermarket and pick up some fish.

I served mine on brown rice (love the chewy texture) but it does take a little longer to cook.  Really pressed for time? You can pick up par-boiled brown rice from the supermarket (when you drop in to get the fish) or if you're super-prepared you may have some in your freezer (not me).  Otherwise, just put the rice on as soon as you walk in the door, and it will be done by the time the fish is. 

I also added a few more veges because I can't resist added veges to recipes (occasionally to their detriment).  I chopped half a zucchini, a stick of celery and a carrot.  The carrot I added about five minutes before the end, the celery and zucchini about two minutes before the end.  I like my veges crunchy, so add them with the fish if you like.  I also chopped the fish into large-ish pieces.


This recipe is for six people, but we both had double helpings, and I took the left overs to work for lunch the next day.  Left overs are often better the day after, I think.


Fish Tagine with Tomatoes, Capers, and Cinnamon

Makes 6 servings


  • 3/4 teaspoon ground cumin

  • 1/4 cup extra-virgin olive oil [I just used a good couple of slugs]

  • 1 (15-ounce) can stewed tomatoes, chopped

  • 1 1/2 tablespoons drained capers [I forgot these]

  • 1/2 teaspoon cinnamon

  • 4 (6-ounce) pieces hake or halibut fillet (about 1-inch-thick)


  • Heat cumin in oil in a heavy skillet over medium heat, stirring occasionally, until fragrant, about 1 minute. Stir in tomatoes, capers, cinnamon, and 1/4 teaspoon each of salt and pepper and simmer, uncovered, stirring occasionally, until thickened, about 10 minutes.
    Pat fish dry and sprinkle with 1/4 teaspoon each of salt and pepper, then add to skillet. Cover and simmer until fish is just cooked through, 7 to 10 minutes.


    Monday, June 13, 2011

    Sneaky Grains: Artichoke-Rosemary Tart with Polenta Crust

    For a while now I've been making small substitutions in my recipes to subtly nudge them higher up the health-scale.  Things like using yoghurt and cottage cheese to bulk up fritattas and muffins, sprinkling LSA on my breakfast, and slipping some quinoa into my breakfast.  It has been a windy path of trial and error and I find the error seems to come when too much of the flavour is sacrificed in the substitution.  For me there is no point in eating tasteless food just because it's healthy - what would be the point of taste buds?

    Last week a new cookbook joined my stable which seems to neatly summarise my current thinking - Ancient Grains for Modern Meals by Maria Speck.  Ranging from breakfast to dessert, it has delicious-sounding recipes which feature well and lesser-known grains in starring or supporting roles.


    Amazon blurb: "Food lovers and health-conscious home chefs alike learn how to integrate whole grains into their busy lives, from quick-cooking quinoa and buckwheat to the slower varieties such as spelt and Kamut. The stunning flavors and lively textures of whole grains are enhanced with natural ingredients such as butter, cream, and prosciutto--in moderation--to create lush Mediterranean-inspired recipes."


    My first experiment was with a polenta-crusted tart.  The recipe is from the book, but I didn't have artichokes in the pantry so I improvised a bit using zucchini strips (potato peeler works well for this) instead of artichokes.  It was a bit of a long process - not a good Monday night meal and I think using zucchini was a mistake (see - trial and error!) because the filling lost a bit of flavour.  Next time I'd roast some pumpkin or toss in some bacon/prosciutto.  Sander didn't like the polenta crust much (he freely admits he's not a huge fan of polenta) but I think it has potential - I just need to play around with the seasoning I think.


    As we've just come back from a fabulous (but super indulgent) weekend in Hong Kong and I'm feeling distinctly in need of some healthy food and early nights, I think Ancient Grains will be well used for the next wee while.  I'll just lay off the polenta for Sander's sake.


    Artichoke-Rosemary Tart with Polenta Crust


    Polenta Crust
    ·         1 ½ C vegetable stock (low-salt if you can)
    ·         1 ¼ C water
    ·         ½  t fine sea salt
    ·         1 ¼ C polenta
    ·         ½ C shredded Parmesan cheese (use large holes of grater)
    ·         1 large egg (at room temp)
    ·         ¼ t freshly ground black pepper
    Artichoke Cheese Filling
    ·         1C plain yoghurt
    ·         2 large eggs
    ·         ½ C finely chopped green onions (about 3)
    ·         2T chopped fresh flat-leaf parsley
    ·         1T minced fresh rosemary
    ·         ½ t fine sea salt
    ·         ¼ t freshly ground black pepper
    ·         1 package frozen quartered artichoke hearts, thawed and drained (12-oz)
    ·         ½ C crumbled goat cheese
    ·         ½ C shredded Parmesan cheese

    1.       To make the polenta crust, bring the stock and the water to a boil in a large heavy-bottomed saucepan over medium-high heat.  Add the salt.  Using a large whisk, slowly add the polenta in a thin stream, and continue whisking for 30 more seconds.  Decrease the heat to low and cover.  Cook for 10 minutes, stirring vigorously with a wooden spoon about every 2 minutes to keep the polenta from sticking to the bottom.  Remove the saucepan from the heat and let sit, covered, for 10 minutes, stirring a few times.  The polenta will be fairly stiff.  Stir in the cheese, egg and pepper.


    2.       Grease a 10-inch ceramic tart pan with olive oil or coat with cooking spray, and place on a wire rack.  Have ready a tall glass of cold water.  Dip a wooden spoon into the water as needed as you spread the polenta mixture across the center of the pan, pushing it up the sides.  Set aside to firm up at room temperature, about 15 minutes, and then form an even rim about ¾ inch thick with your slightly moist fingers, pressing firmly.


    3.       Meanwhile, position a rack in the center of the oven and preheat to 190°C
    4.       Prepare the artichoke cheese filling.   Place the yoghurt, eggs, green onions, parsley, rosemary, salt and pepper in a 2C liquid measure or a medium bowl and combine well with a fork.  Distribute the artichoke quarters over the crust, cut sides up forming a circle along the rim and filling the center (you might not need all the hearts).  Sprinkle the goats cheese on to and gently pour the filling over the artichokes.  Sprinkle with the Parmesan cheese.


    5.       Bake the tart until the top turns golden brown and the filling sis set, about 45 minutes.  Transfer the pan to a wire rack and set aside and room temp to firm up for at least 20 mins, 40 if you can wait.  Using a sharp serrated knife, cut into slices.  Serve with more freshly ground pepper on top if you like.

    Wednesday, June 8, 2011

    Super-Satisfying Lamb Sausages and Lentils

    On Monday night I was craving a bit of comfort food - something tasty and healthy (of course) but also with a bit of grunt to it. Something that would warmly fill every nook and cranny of my tummy; something like...sausages.

    Odd, I know, as sausages usually don't tick the 'healthy' box, but choose good quality ones, pair them with lentils and some veggies and you have a super speedy, satisfying meal in a bowl.

    I adapted a recipe from my Italian cooking bible - The Silver Spoon. Their recipe uses normal lentils and requires some advanced preparation (soaking). Being a Monday night, advanced preparation was definitely not going to happen, but who needs soaking when you have Puy lentils? The Silver Spoon also doesn't include enough veggies for my liking (just in this recipe), so I free-styled a bit.


    Lamb Sausages and Lentils
    Serves 2

    ·         250g Puy lentils
    ·         1 carrot
    ·         1 celery stick
    ·         2 shallots
    ·         1 garlic clove
    ·         2 lamb sausages
    ·         Feta cheese (cubed)
    ·         Olive oil (approx 2T)
    ·         Baby tomatoes (halved)
    ·         Mint (roughly ripped)

    Roughly chop half the carrot and half the celery stick. Take one shallot and cut in half also. In a saucepan, cook lentils with the chopped carrot, celery and shallot with enough water (water level about 2-3cm above the lentil level). Bring to the boil and then simmer.

    While lentils are cooking, cut remaining half carrot and celery into small cubes and finely chop shallot and garlic. Roughly chop sausages to your preference (mine were approx 1-2cm slices).

    Heat oil in a pan over a low heat and gently fry shallot, garlic and sausages. Add carrot and celery as lentils near completion.


    Pour strained lentils (discard carrot, celery and shallot) into a warmed bowl, top with sausage mixture from pan (yes, include all the oil) and season to taste.  Finally add halved baby tomatoes, feta and torn mint leaves.


    Mix and serve.


    You can pretty much use whatever ingredients you have on hand here - eggplant, zucchini, basil, parsley, or leave out the sausage and serve with lamb chops. You are only limited by your imagination. Get cooking!

    Saturday, June 4, 2011

    Campbell's Tomato Soup, Warhol Style

    We have a really high stud in our apartment, almost like a mezzanine floor.  This means there is a lot of white wall space above our sofa begging to be filled.  Wait no more!


    I love food enough to put it on my wall


    The Journey

    I cannot bring myself to tear pages out of magazines.  It somehow seems sacrilegious, like folding over the corner of a book instead of finding a book mark.  This means I'm often inspired by what I see and read, but then promptly forget it once the magazine is finished.  Once I bought an iPhone I had the solution - take a quick snap of the idea or inspiring image and it's stored away for future reference.  Now my image archive is full of home-wear items, design ideas, clothes, shoes... basically anything beautiful or eye-catching.

    Which brings me to Warhol's iconic Campbell's Tomato Soup.  While flicking through an old issue of Hello magazine I came across an interview with a couple about their home.  The article itself wasn't that interesting (I have completely forgotten the who/what/where) but a piece of art on their wall stopped me.  ''I want this'', I thought.  Snap.


    When getting ready for our April visit to Ho Chi Minh City we read that you can get paintings copied - eureka!  So off we went with an image in hand.  After two long months of waiting, they have finally arrived and they're every bit as good as I hoped.


    We're still playing around a bit with the final layout.  Currently the center-left piece is sitting further out and we'll probably move the top-right piece up and out a bit too.

    I love it!